Write a blog on a topic of your choice related to a niche technology field
How to do ?
Write the blog in a word format, you can also add supporting pictures for your blog (Do mention the source)
Blog should have minimum of 800 words
Send the word file along with images in zip format to [email protected] by 30th May Midnight.
Who can participate?
Any individual can participate in the competition , there is no age limit.
Winning Criteria ?
The top selected blogs will be posted on the website of Robotech Labs, The links will be shared to all the participants, you need to share your blog with the world.
The blog with most combined shares on Social Media will win the Blogging Competition.
What is the prize?
The Winner will get Cash Prize or Goodies like Pendrive etc worth INR 2500/-
Deadlines ?
Last date to submit the entry : 30th May 2020 midnight.
Few years ago when the programming was quite difficult,only professionals and highly experienced people were able to write the program for the computer and machines. Nowadays many more complex systems are created and their complexity is increasing day by day but somehow we can analyze and relate those concept, thanks to the technology in education which enhances learning skills and makes learning an effective learning and the technology which are easy to operate and have the similar functionalities like complex systems.
An Arduino is an example of the technology which gives you hands on experience with hardware as well the software program to operate the hardware.If you are a beginner/enthusiast in embedded systems and robotics
,if you want to explore how thing works and how to make thing work Arduino is a perfect board to start with.
Arduino company have a wide varieties of boards designed to perform different tasks based on your requirement.From an arduino which you can stitch to your cloth to a wi-fi enabled arduino everything is available to make projects like turn signal indication t-shirt to control your home appliances from anywhere in the world where internet connectivity is available. Every board have specific GPIO pins.You can attach input devices like a sensor to collect the data and output devices like motor/actuator to react on that data.
ARDUINO
Arduino is an open source electronic prototyping platform used to build electronics projects with the help of an easy to use hardware and software.
Lets get Started with Arduino .
Image:Arduino Uno
Arduino Uno is a flagship board of Arduino Company.
Technical Specifications:-
Microcontroller – Atmega328
Operating Voltage – 5volts
Input Voltage – 7v-12v(recommended)
Analog Input Pins – 6 pins
Digital I/O Pins – 14(6 PWM pins)
Power Out Pins – 3v,5v
Let us work with Arduino using a simple experiment to Blink two led’s consecutively with the help of digital pins.
Components Required:-
Arduino Uno
Usb Cable for Arduino
5 Male to Male Jumper Wires
Breadboard
2 Led’s
Laptop/PC with Arduino IDE installed
Connections: +ve Led1->pin no.5
–veLed1->Ground
+ve Led2->pin no.6
-ve Led2->Ground
Resistors are not necessary, you can make the circuit without resistors. In case if you want to connect a resistor than connect a 100 ohm resistor with Blue led and 220 ohm resistor with Red led.
Image: Connections
After completing the connections , Open Arduino IDE and upload the code. The Code is shown below. The two LED’s are connected on PIN 5 & 6.
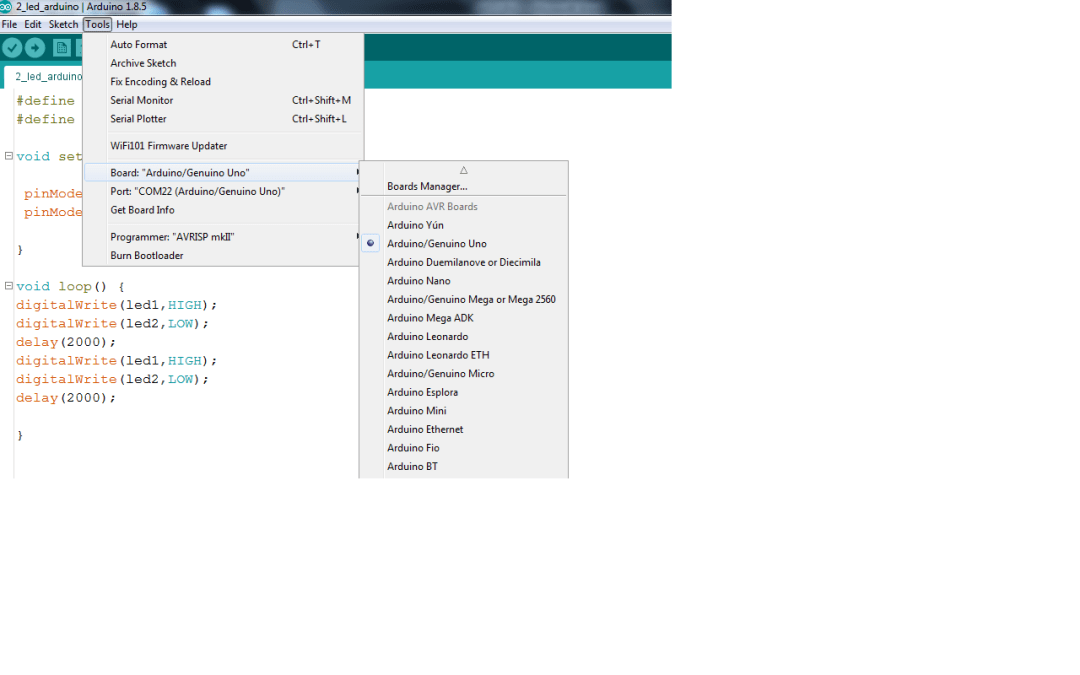
Board Selection :
Now open tools menu and select the Arduino uno/Genuino from the board option.
After selecting the board option we have to tell to the Arduino IDE on which port Arduino UNO is connected. So click on tools menu and select the port option and choose the port on which Arduino is connected.
After Selecting the right board and port upload the program with the help of Upload button .If you followed every step mentioned above your Led should have started blinking.
Humans reacts on everything on the basis of past experience or the conscious mind and are independent to take the decisions,machine performs the task they are taught.Humans can take the decision by their own intelligence but the machines are bound to take the decision according to the parameters they have in their control body i.e. computer program or code.Machine Learning is the field which gives capability to machines without being accurately programmed.
Machine Learning uses algorithms,mathematical models to predict the most related outcome for a specific task.
Machine Learning is sub-categorized to three types :
1->Supervised Learning -(A training data is required to learn)
2->Unsupervised Learning -(Machine is able to learn self sufficiently)
3->Reinforcement Learning-(By using Hit and trial method machine is able to learn)
Example-
Have you ever searched some project on the e-commerce website and got the suggestion of the same product on
your any social media account or got the suggestion like people also buy the same product with this,
this is done with the help of machine learning,An algorithm is designed in such a manner to show the previous bought
together product with the same product or the product you have been searching on different sites.
There are different platforms to get started with Machine Learning, Mostly at learning stage people use Python to begin with. You can check out the Installation of Anaconda in this Blog Post to install Anaconda and Get Started.